# 常见用法
# Flashing the Compute Module eMMC
The Compute Module has an on-board eMMC device connected to the primary SD card interface. This guide explains how to write data to the eMMC storage using a CM4 Industrial.
Please also read the section in the Compute Module Datasheets (opens new window)
# Steps to Flash the eMMC
To flash the Compute Module eMMC, you either need a Linux system (a Raspberry Pi is recommended, or Ubuntu on a PC) or a Windows system (Windows 10 is recommended).
# Setting up the CM4 Industrial
- Use a micro USB cable to connect the micro USB slave port J73 on CM4 Industrial to the host device.
- Do not power up yet.
# For Windows Users
Under Windows, an installer is available to install the required drivers and boot tool automatically. Alternatively, a user can compile and run it using Cygwin and/or install the drivers manually.
# Windows Installer
For those who just want to enable the Compute Module eMMC as a mass storage device under Windows, the stand-alone installer is the recommended option. This installer has been tested on Windows 10 32-bit and 64-bit, and Windows XP 32-bit.
Please ensure you are not writing to any USB devices whilst the installer is running.
- Download and run the Windows installer (opens new window) to install the drivers and boot tool.
- Plug your host PC USB into the USB SLAVE port, making sure you have setup the board as described above.
- Apply power to the board; Windows should now find the hardware and install the driver.
- Once the driver installation is complete, run the
RPiBoot.exetool that was previously installed. - After a few seconds, the Compute Module eMMC will pop up under Windows as a disk (USB mass storage device).
# Building rpiboot on your host system (Cygwin/Linux)
We will be using Git to get the rpiboot source code, so ensure Git is installed. In Cygwin, use the Cygwin installer. On a Pi or other Debian-based Linux machine, use the following command:
sudo apt install git
Git may produce an error if the date is not set correctly. On a Raspberry Pi, enter the following to correct this:
sudo date MMDDhhmm
where MM is the month, DD is the date, and hh and mm are hours and minutes respectively.
Clone the usbboot tool repository:
git clone --depth=1 https://github.com/raspberrypi/usbboot
cd usbboot
libusb must be installed. If you are using Cygwin, please make sure libusb is installed as previously described. On Raspberry Pi OS or other Debian-based Linux, enter the following command:
sudo apt install libusb-1.0-0-dev
Now build and install the usbboot tool:
make
Run the usbboot tool and it will wait for a connection:
sudo ./rpiboot
Now plug the host machine into the CM4 Industrial USB slave port(micro-B USB port) and power it on. The rpiboot tool will discover the Compute Module and send boot code to allow access to the eMMC.
For more information run
./rpiboot -h
# Writing to the eMMC (Windows)
After rpiboot completes, a new USB mass storage drive will appear in Windows. We recommend following this guide (opens new window) and using Win32DiskImager to write images to the drive, rather than trying to use /dev/sda etc. from Cygwin.
Make sure J4 (USB SLAVE BOOT ENABLE) / J2 (nRPI_BOOT) is set to the disabled position and/or nothing is plugged into the USB slave port. Power cycling the IO board should now result in the Compute Module booting from eMMC.
# Writing to the eMMC (Linux)
After rpiboot completes, you will see a new device appear; this is commonly /dev/sda on a Pi but it could be another location such as /dev/sdb, so check in /dev/ or run lsblk before running rpiboot so you can see what changes.
You now need to write a raw OS image (such as Raspberry Pi OS (opens new window)) to the device. Note the following command may take some time to complete, depending on the size of the image: (Change /dev/sdX to the appropriate device.)
sudo dd if=raw_os_image_of_your_choice.img of=/dev/sdX bs=4MiB
Once the image has been written, unplug and re-plug the USB; you should see two partitions appear (for Raspberry Pi OS) in /dev. In total, you should see something similar to this:
/dev/sdX    <- Device
/dev/sdX1   <- First partition (FAT)
/dev/sdX2   <- Second partition (Linux filesystem)
The /dev/sdX1 and /dev/sdX2 partitions can now be mounted normally.
Make sure nothing is plugged into the USB slave port. Power cycling the IO board should now result in the Compute Module booting from eMMC.
# Introduction to Remote Access
Sometimes you need to access a Raspberry Pi without connecting it to a monitor. Perhaps the Pi is embedded in something like a robot, or you may want to view some information from it from elsewhere. Or perhaps you simply don’t have a spare monitor!
You can connect to your Raspberry Pi from another machine. But in order to do so you’ll need to know its IP Address.
Any device connected to a Local Area Network is assigned an IP address. In order to connect to your Raspberry Pi from another machine using SSH (opens new window) or VNC (opens new window), you need to know the Pi’s IP address. This is easy if you have a display connected, and there are a number of methods for finding it remotely from another machine on the network.
# How to Find your IP Address
It is possible to find the IP address of your Pi without connecting to a screen using one of the following methods:
| NOTE | If you are using a display with your Raspberry Pi and if you boot to the command line instead of the desktop, your IP address should be shown in the last few messages before the login prompt. Otherwise open a Terminal window and type hostname -I which will reveal your Raspberry Pi’s IP address. |
|---|---|
# Router devices list
In a web browser navigate to your router’s IP address e.g. http://192.168.1.1, which is usually printed on a label on your router; this will take you to a control panel. Then log in using your credentials, which is usually also printed on the router or sent to you in the accompanying paperwork. Browse to the list of connected devices or similar (all routers are different), and you should see some devices you recognise. Some devices are detected as PCs, tablets, phones, printers, etc. so you should recognise some and rule them out to figure out which is your Raspberry Pi. Also note the connection type; if your Pi is connected with a wire there should be fewer devices to choose from.
# Resolving raspberrypi.local with mDNS
On Raspberry Pi OS, multicast DNS is supported out-of-the-box by the Avahi service.
If your device supports mDNS, you can reach your Raspberry Pi by using its hostname and the .local suffix. The default hostname on a fresh Raspberry Pi OS install is raspberrypi, so by default any Raspberry Pi running Raspberry Pi OS responds to:
ping raspberrypi.local
If the Raspberry Pi is reachable, ping will show its IP address:
PING raspberrypi.local (192.168.1.131): 56 data bytes
64 bytes from 192.168.1.131: icmp_seq=0 ttl=255 time=2.618 ms
If you change the system hostname of the Raspberry Pi (e.g., by editing /etc/hostname), Avahi will also change the .local mDNS address.
If you don’t remember the hostname of the Raspberry Pi, but have a system with Avahi installed, you can browse all the hosts and services on the LAN with the avahi-browse (opens new window) command.
# nmap command
The nmap command (Network Mapper) is a free and open-source tool for network discovery, available for Linux, macOS, and Windows.
- To install on Linux, install the
nmappackage e.g.apt install nmap. - To install on macOS or Windows, see the nmap.org download page (opens new window).
To use nmap to scan the devices on your network, you need to know the subnet you are connected to. First find your own IP address, in other words the one of the computer you’re using to find your Pi’s IP address:
- On Linux, type
hostname -Iinto a terminal window - On macOS, go to
System PreferencesthenNetworkand select your active network connection to view the IP address - On Windows, go to the Control Panel, then under
Network and Sharing Center, clickView network connections, select your active network connection and clickView status of this connectionto view the IP address
Now you have the IP address of your computer, you will scan the whole subnet for other devices. For example, if your IP address is 192.168.1.5, other devices will be at addresses like 192.168.1.2, 192.168.1.3, 192.168.1.4, etc. The notation of this subnet range is 192.168.1.0/24 (this covers 192.168.1.0 to 192.168.1.255).
Now use the nmap command with the -sn flag (ping scan) on the whole subnet range. This may take a few seconds:
nmap -sn 192.168.1.0/24
Ping scan just pings all the IP addresses to see if they respond. For each device that responds to the ping, the output shows the hostname and IP address like so:
Starting Nmap 6.40 ( http://nmap.org ) at 2014-03-10 12:46 GMT
Nmap scan report for hpprinter (192.168.1.2)
Host is up (0.00044s latency).
Nmap scan report for Gordons-MBP (192.168.1.4)
Host is up (0.0010s latency).
Nmap scan report for ubuntu (192.168.1.5)
Host is up (0.0010s latency).
Nmap scan report for raspberrypi (192.168.1.8)
Host is up (0.0030s latency).
Nmap done: 256 IP addresses (4 hosts up) scanned in 2.41 seconds
Here you can see a device with hostname raspberrypi has IP address 192.168.1.8. Note, to see the hostnames, you must run nmap as root by prepending sudo to the command.
# Getting IPv6 addresses by pinging from a second device
First find your own IP address(es), in other words the one of the computer you’re using to find your Pi’s IP address by hostname -I
fd00::ba27:ebff:feb6:f293 2001:db8:494:9d01:ba27:ebff:feb6:f293
The example shows two IP addresses. The first one is a so called unique local unicast address(fc00::/7). The second one is the global unicast address(2000::/3). It is also possible to see only one them depending on your network (router) configuration. Both addresses are valid for reaching the Raspberry Pi within your LAN. The address out of 2000::/3 is accessible world wide, provided your router’s firewall is opened.
Now use one of IPs from the first step to ping all local nodes:
ping -c 2 -I 2001:db8:494:9d01:ba27:ebff:feb6:f293  ff02::1
ping -c 2 -I 2001:db8:494:9d01:ba27:ebff:feb6:f293  ff02::1%eth0
-c 2 stands for sending two echo requests
-I with the IP address, it sets the interface and the source address of the echo request, it is necessary to choose the interface’s IP address, eth0 isn’t sufficient - the answer would be the local link address(fe80::/10), we need the global or local unicast address
ff02::1 is a well known multicast address for all nodes on the link, so it behaves like a local broadcast, usually it is defined in /etc/hosts so you can also use the name (ip6-allnodes or ipv6-allnodes) instead of the literal address
Some newer systems expect the interface ID behind the multicast address.
ping -c 2 -I 2001:db8:494:9d01:ba27:ebff:feb6:f293 ip6-allnodes
PING ip6-allnodes(ip6-allnodes (ff02::1)) from 2001:db8:494:9d01:ba27:ebff:feb6:f293 : 56 data bytes
64 bytes from 2001:db8:494:9d01:ba27:ebff:feb6:f293: icmp_seq=1 ttl=64 time=0.597 ms
64 bytes from witz.fritz.box (2001:db8:494:9d01:728b:cdff:fe7d:a2e): icmp_seq=1 ttl=255 time=1.05 ms (DUP!)
64 bytes from raspberrypi4.fritz.box (2001:db8:494:9d01:dea6:32ff:fe23:6be1): icmp_seq=1 ttl=64 time=1.05 ms (DUP!)
64 bytes from 2001:db8:494:9d01:da37:beff:fefd:f09d (2001:db8:494:9d01:da37:beff:fefd:f09d): icmp_seq=1 ttl=255 time=1.05 ms (DUP!)
64 bytes from fusion.fritz.box (2001:db8:494:9d01:1e6f:65ff:fec9:8746): icmp_seq=1 ttl=255 time=2.12 ms (DUP!)
64 bytes from fritz.box (2001:db8:494:9d01:464e:6dff:fe72:8a08): icmp_seq=1 ttl=64 time=2.62 ms (DUP!)
64 bytes from raspberrypi.fritz.box (2001:db8:494:9d01:ba27:ebff:feb6:f293): icmp_seq=2 ttl=64 time=0.480 ms

--- ip6-allnodes ping statistics ---
2 packets transmitted, 2 received, +5 duplicates, 0% packet loss, time 1001ms
rtt min/avg/max/mdev = 0.480/1.283/2.623/0.735 ms
This should result in replies from all the nodes on your (W)LAN link, with associated DNS names.
Exclude your own IP( here 2001:db8:494:9d01:ba27:ebff:feb6:f293 ), then check the others by trying to connect them via SSH.
ssh pi@2001:db8:494:9d01:dea6:32ff:fe23:6be1
The authenticity of host '2001:db8:494:9d01:dea6:32ff:fe23:6be1 (2001:db8:494:9d01:dea6:32ff:fe23:6be1)' can't be established.
ECDSA key fingerprint is SHA256:DAW68oen42TdWDyrOycDZ1+y5ZV5D81kaVoi5FnpvoM.
Are you sure you want to continue connecting (yes/no)? yes
Warning: Permanently added '2001:db8:494:9d01:dea6:32ff:fe23:6be1' (ECDSA) to the list of known hosts.
pi@2001:db8:494:9d01:dea6:32ff:fe23:6be1's password:
Linux raspberrypi4 4.19.75-v7l+ #1270 SMP Tue Sep 24 18:51:41 BST 2019 armv7l

...

pi@raspberrypi4:~ $
# Getting the IP address of a Pi using your smartphone
The Fing app is a free network scanner for smartphones. It is available for Android (opens new window) and iOS (opens new window).
Your phone and your Raspberry Pi have to be on the same network, so connect your phone to the correct wireless network.
When you open the Fing app, touch the refresh button in the upper right-hand corner of the screen. After a few seconds you will get a list with all the devices connected to your network. Scroll down to the entry with the manufacturer "Raspberry Pi". You will see the IP address in the bottom left-hand corner, and the MAC address in the bottom right-hand corner of the entry.
# Setting up an SSH Server
You can access the command line of a Raspberry Pi remotely from another computer or device on the same network using the Secure Shell (SSH) protocol.
You will only have access to the command line, not the full desktop environment. For a full remote desktop, see VNC (opens new window).
# Set up your Local Network
Make sure your Raspberry Pi is properly set up and connected. If you are using wireless networking, this can be enabled via the desktop user interface, or using from the command line. If you are not using wireless connectivity, plug your Raspberry Pi directly into the router.
| NOTE | You will need to note down the IP address of your Raspberry Pi in order to connect to it later. Using the ifconfig command will display information about the current network status, including the IP address, or you can use hostname -I to display the IP addresses associated with the device. |
|---|---|
# Enabling the Server
Raspberry Pi OS has the SSH server disabled by default. It can be enabled manually from the desktop:
- Launch
Raspberry Pi Configurationfrom thePreferencesmenu - Navigate to the
Interfacestab - Select
Enablednext toSSH - Click
OK
Alternatively you can enable it from the terminal using the raspi-config (opens new window) application,
- Enter
sudo raspi-configin a terminal window - Select
Interfacing Options - Navigate to and select
SSH - Choose
Yes - Select
Ok - Choose
Finish
| NOTE | For headless setup, SSH can be enabled by placing a file named ssh, without any extension, onto the boot partition of the SD Card. When the Raspberry Pi boots, it looks for the ssh file. If it is found, SSH is enabled and the file is deleted. The content of the file does not matter; it could contain text, or nothing at all. |
|---|---|
| WARNING | When enabling SSH on a Raspberry Pi that may be connected to the internet, you should change the default password (opens new window) to ensure that it remains secure. |
|---|---|
# Secure Shell from Linux or Mac OS
You can use SSH to connect to your Raspberry Pi from a Linux desktop, another Raspberry Pi, or from an Apple Mac without installing additional software.
Open a terminal window on your computer replacing <IP> with the IP address of the Raspberry Pi you’re trying to connect to,
ssh pi@<IP>
When the connection works you will see a security/authenticity warning. Type yes to continue. You will only see this warning the first time you connect.
| NOTE | If you receive a connection timed out error it is likely that you have entered the wrong IP address for the Raspberry Pi. |
|---|---|
| WARNING | In the event your Pi has taken the IP address of a device to which your computer has connected before (even if this was on another network), you may be given a warning and asked to clear the record from your list of known devices. Following this instruction and trying the ssh command again should be successful. |
|---|---|
Next you will be prompted for the password for the pi login: the default password on Raspberry Pi OS is raspberry.
For security reasons it is highly recommended to change the default password on the Raspberry Pi (also, you can not login through ssh if the password is blank). You should now be able to see the Raspberry Pi prompt, which will be identical to the one found on the Raspberry Pi itself.
If you have set up another user on the Raspberry Pi, you can connect to it in the same way, replacing the username with your own, e.g. eben@192.168.1.5
pi@raspberrypi ~ $
You are now connected to the Raspberry Pi remotely, and can execute commands.
# Forwarding X11
You can also forward your X session over SSH, to allow the use of graphical applications, by using the -Y flag:
ssh -Y pi@192.168.1.5
| NOTE | X11 is no longer installed by default on macOS (opens new window), so you will have to download (opens new window) and install it. |
|---|---|
Now you are on the command line as before, but you have the ability to open up graphical windows. For example, typing:
geany &
will open up the Geany editor in a window on your local desktop.
# Secure Shell from Windows 10
You can use SSH to connect to your Raspberry Pi from a Windows 10 computer that is using October 2018 Update or later without having to use third-party clients.
Open a terminal window on your computer replacing <IP> with the IP address of the Raspberry Pi you’re trying to connect to,
ssh pi@<IP>
When the connection works you will see a security/authenticity warning. Type yes to continue. You will only see this warning the first time you connect.
| NOTE | If you receive a connection timed out error it is likely that you have entered the wrong IP address for the Raspberry Pi. |
|---|---|
| WARNING | In the event your Pi has taken the IP address of a device to which your computer has connected before (even if this was on another network), you may be given a warning and asked to clear the record from your list of known devices. Following this instruction and trying the ssh command again should be successful. |
|---|---|
Next you will be prompted for the password for the pi login: the default password on Raspberry Pi OS is raspberry.
For security reasons it is highly recommended to change the default password on the Raspberry Pi (also, you can not login through ssh if the password is blank). You should now be able to see the Raspberry Pi prompt, which will be identical to the one found on the Raspberry Pi itself.
If you have set up another user on the Raspberry Pi, you can connect to it in the same way, replacing the username with your own, e.g. eben@192.168.1.5
pi@raspberrypi ~ $
You are now connected to the Raspberry Pi remotely, and can execute commands.
# Passwordless SSH Access
It is possible to configure your Raspberry Pi to allow access from another computer without needing to provide a password each time you connect. To do this, you need to use an SSH key instead of a password. To generate an SSH key:
# Checking for Existing SSH Keys
First, check whether there are already keys on the computer you are using to connect to the Raspberry Pi:
ls ~/.ssh
If you see files named id_rsa.pub or id_dsa.pub then you have keys set up already, so you can skip the 'Generate new SSH keys' step below.
# Generate new SSH Keys
To generate new SSH keys enter the following command:
ssh-keygen
Upon entering this command, you will be asked where to save the key. We suggest saving it in the default location (~/.ssh/id_rsa) by pressing Enter.
You will also be asked to enter a passphrase, which is optional. The passphrase is used to encrypt the private SSH key, so that if someone else copied the key, they could not impersonate you to gain access. If you choose to use a passphrase, type it here and press Enter, then type it again when prompted. Leave the field empty for no passphrase.
Now look inside your .ssh directory:
ls ~/.ssh
and you should see the files id_rsa and id_rsa.pub:
authorized_keys id_rsa id_rsa.pub known_hosts
The id_rsa file is your private key. Keep this on your computer.
The id_rsa.pub file is your public key. This is what you share with machines that you connect to: in this case your Raspberry Pi. When the machine you try to connect to matches up your public and private key, it will allow you to connect.
Take a look at your public key to see what it looks like:
cat ~/.ssh/id_rsa.pub
It should be in the form:
ssh-rsa <REALLY LONG STRING OF RANDOM CHARACTERS> user@host
# Copy your Key to your Raspberry Pi
Using the computer which you will be connecting from, append the public key to your authorized_keys file on the Raspberry Pi by sending it over SSH:
ssh-copy-id <USERNAME>@<IP-ADDRESS>
| NOTE | During this step you will need to authenticate with your password. |
|---|---|
Alternatively, if ssh-copy-id is not available on your system, you can copy the file manually over SSH:
cat ~/.ssh/id_rsa.pub | ssh <USERNAME>@<IP-ADDRESS> 'mkdir -p ~/.ssh && cat >> ~/.ssh/authorized_keys'
If you see the message ssh: connect to host <IP-ADDRESS> port 22: Connection refused and you know the IP-ADDRESS is correct, then you may not have enabled SSH on your Raspberry Pi. Run sudo raspi-config in the Pi’s terminal window, enable SSH, then try to copy the files again.
Now try ssh <USER>@<IP-ADDRESS> and you should connect without a password prompt.
If you see a message "Agent admitted failure to sign using the key" then add your RSA or DSA identities to the authentication agent ssh-agent then execute the following command:
ssh-add
| NOTE | you can also send files over SSH using the scp (opens new window) (secure copy) command. |
|---|---|
# Adjust Directory Permissions
If you can’t establish a connection after following the steps above there might be a problem with your directory permissions. First, you want to check the logs for any errors:
tail -f /var/log/secure
# might return:
Nov 23 12:31:26 raspberrypi sshd[9146]: Authentication refused: bad ownership or modes for directory /home/pi
If the log says Authentication refused: bad ownership or modes for directory /home/pi there is a permission problem regarding your home directory. SSH needs your home and ~/.ssh directory to not have group write access. You can adjust the permissions using chmod:
chmod g-w $HOME
chmod 700 $HOME/.ssh
chmod 600 $HOME/.ssh/authorized_keys
Now only the user itself has access to .ssh and .ssh/authorized_keys in which the public keys of your remote machines are stored.
# Storing the passphrase in the macOS keychain
If you are using macOS, and after verifying that your new key allows you to connect, you have the option of storing the passphrase for your key in the macOS keychain. This allows you to connect to your Raspberry Pi without entering the passphrase.
Run the following command to store it in your keychain:
ssh-add -K ~/.ssh/id_rsa
# Using Secure Copy
Secure Copy (scp) is a command for sending files over SSH. This means you can copy files between computers, say from your Raspberry Pi to your desktop or laptop, or vice-versa.
First of all, you’ll need to know your Raspberry Pi’s IP address.
# Copying Files to your Raspberry Pi
Copy the file myfile.txt from your computer to the pi user’s home folder of your Raspberry Pi at the IP address 192.168.1.3 with the following command:
scp myfile.txt pi@192.168.1.3:
Copy the file to the /home/pi/project/ directory on your Raspberry Pi (the project folder must already exist):
scp myfile.txt pi@192.168.1.3:project/
# Copying Files from your Raspberry Pi
Copy the file myfile.txt from your Raspberry Pi to the current directory on your other computer:
scp pi@192.168.1.3:myfile.txt .
# Copying Multiple Files
Copy multiple files by separating them with spaces:
scp myfile.txt myfile2.txt pi@192.168.1.3:
Alternatively, use a wildcard to copy all files matching a particular search with:
scp *.txt pi@192.168.1.3:
(all files ending in .txt)
scp m* pi@192.168.1.3:
(all files starting with m)
scp m*.txt pi@192.168.1.3:
(all files starting with m and ending in .txt)
| NOTE | Some of the examples above will not work for file names containing spaces. Names like this need to be enclosed in quotes:scp "my file.txt" pi@192.168.1.3: |
|---|---|
# Copying a Whole Directory
Copy the directory project/ from your computer to the pi user’s home folder of your Raspberry Pi at the IP address 192.168.1.3 with the following command:
scp -r project/ pi@192.168.1.3:
# Customize Splash Screen
When the Raspberry Pi OS boot, by default a rainbow screen displays followed by Raspberry Pi’s logo and command lines scrolling down. But you can disable these and add your splash image.
- Remove Raspberry Pi's logo and kernel log
sudo nano /boot/cmdline.txt
At the end of the line add logo.nologo quiet
it should be like:
console=serial0,115200 console=tty1 root=PARTUUID=3eedc92e-02 rootfstype=ext4 elevator=deadline fsck.repair=yes rootwait logo.nologo quiet
- Remove the login prompt
sudo systemctl disable getty@tty1
- Install Linux frame buffer image viewer tool:
fbi
sudo apt update
sudo apt install fbi
- Add a systemd service to load splash image
sudo nano /lib/systemd/system/splashscreen.service
Add
[Unit]
Description=Splash screen
DefaultDependencies=no
After=local-fs.target

[Service]
ExecStart=/usr/bin/fbi -d /dev/fb0 --noverbose -a /home/pi/splash.jpg
StandardInput=tty
StandardOutput=tty

[Install]
WantedBy=sysinit.target
- Enable the systemd service
sudo systemctl enable splashscreen
- Reboot to take effect
sudo reboot
# Network Manager
如果您使用的是带有桌面的系统,我们推荐您安装这个插件network-manager-gnome
sudo apt install network-manager-gnome
sudo reboot
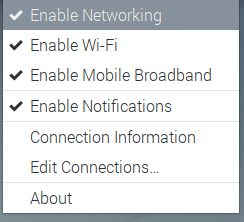
重启之后您会看到这个图标
现在我们已经使用network-manager来管理网络,如果您想使用dhcpcd,请执行以下命令
sudo systemctl stop NetworkManager.service
sudo systemctl disable NetworkManager.service
sudo systemctl enable dhcpcd.service
sudo reboot
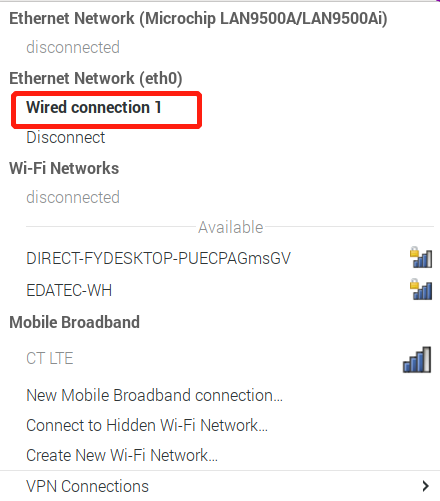
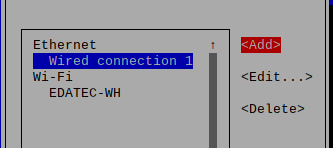
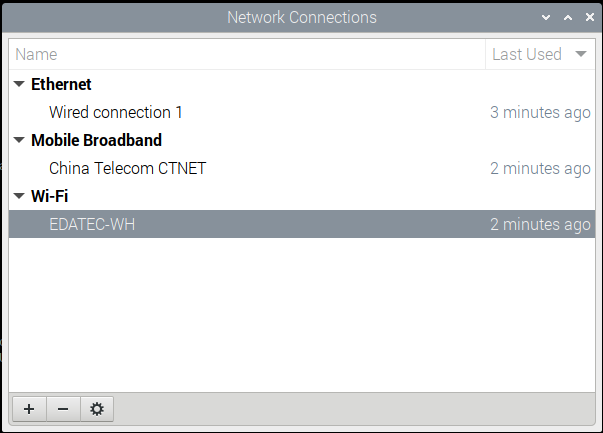
# Wired Connection(eth0)
如果您现在有一个有线连接,您会看到以下界面
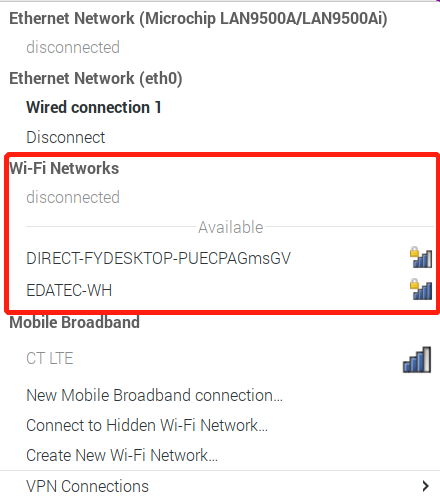
# Wireless Connection(wlan0)
# Desktop
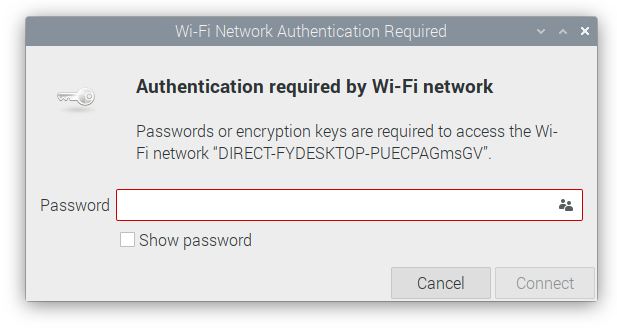
选择WiFi
输入密码
# Lite
显示所有网络连接
nmcli connection我们在此提供了三个命令帮助您更轻松的连接到WiFi
sudo nmcli_addwifi -s <ssid> -p <password>
sudo nmcli_delwifi <ssid1> <ssid2>...
sudo nmcli_change_wifipsk -s <ssid> -p <newpassword> ...
这里还有另一个工具可以配置WiFi
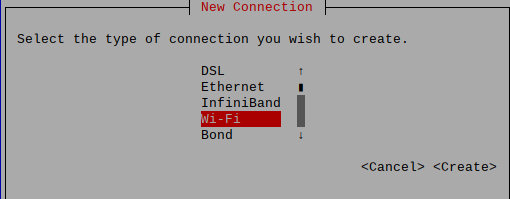
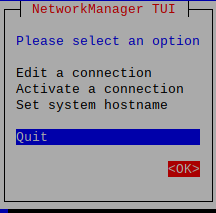
sudo nmtui主菜单
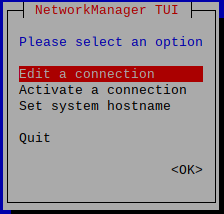
添加网络连接
选择网络连接的类型
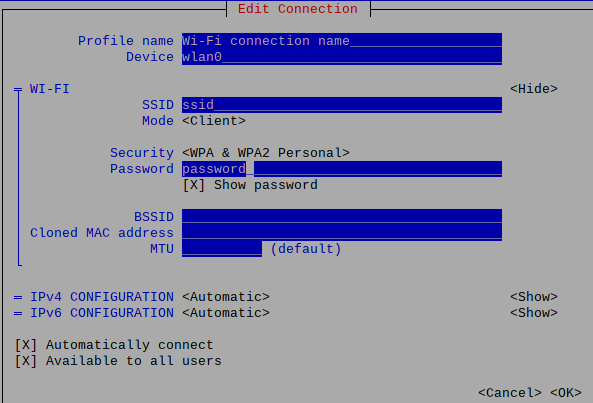
配置WiFi
返回

保存
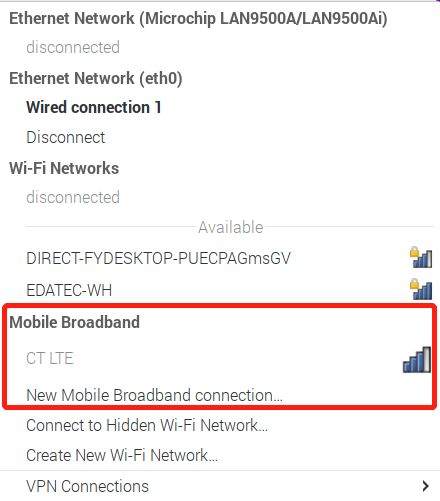
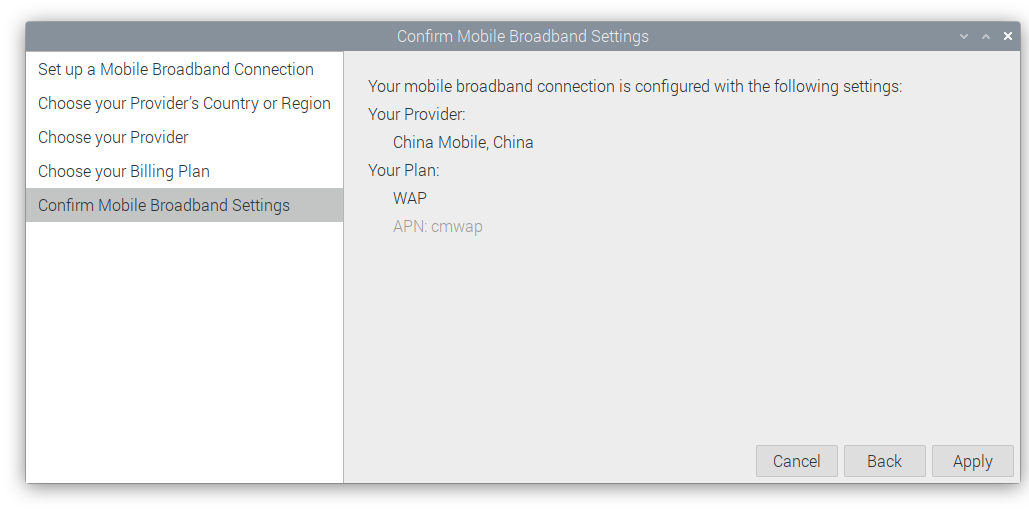
# 4G(wwan0)
在成功识别到4G模块后,会显示以下标志
# Desktop
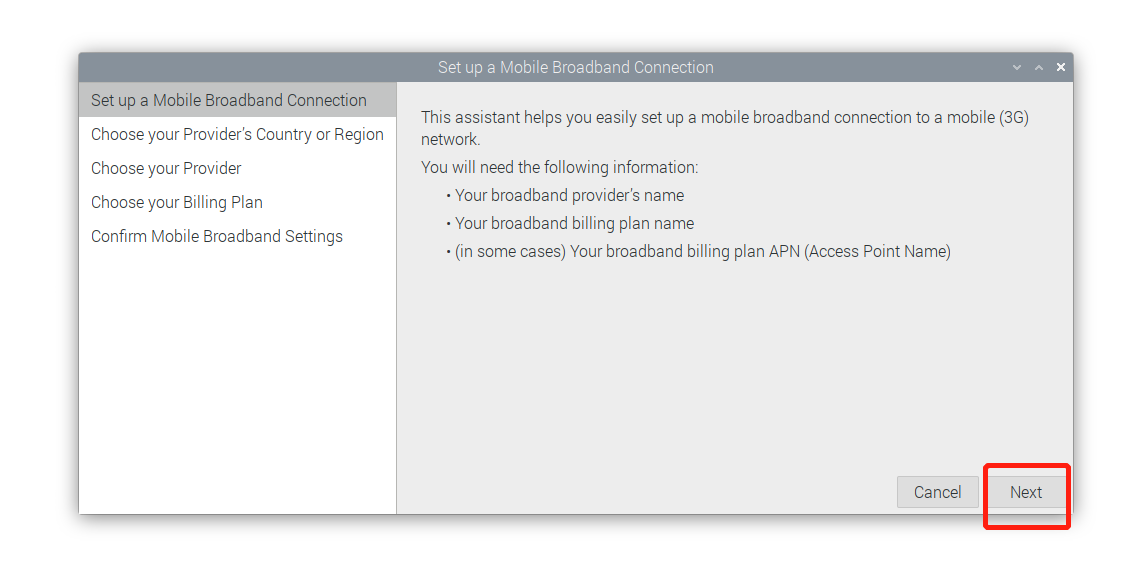
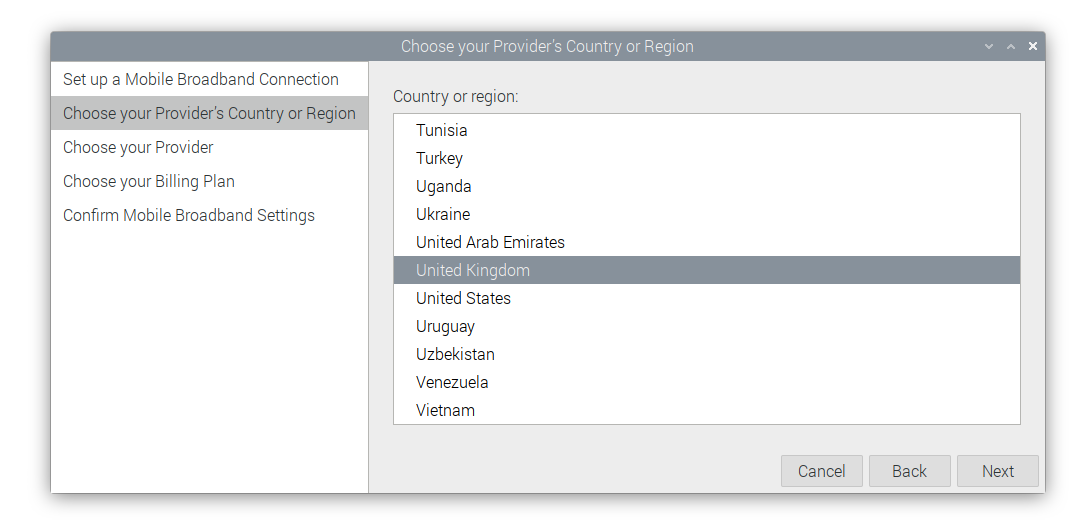
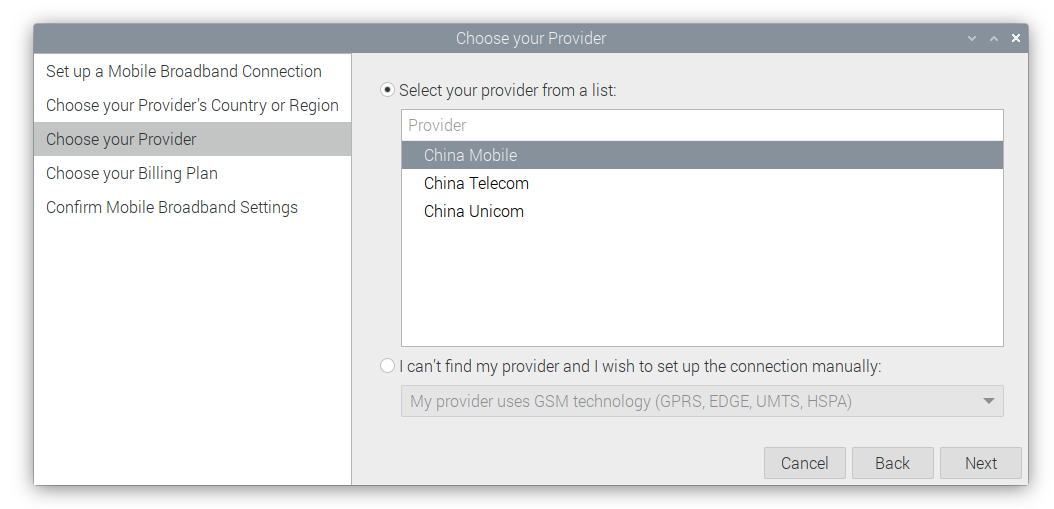
配置4G步骤
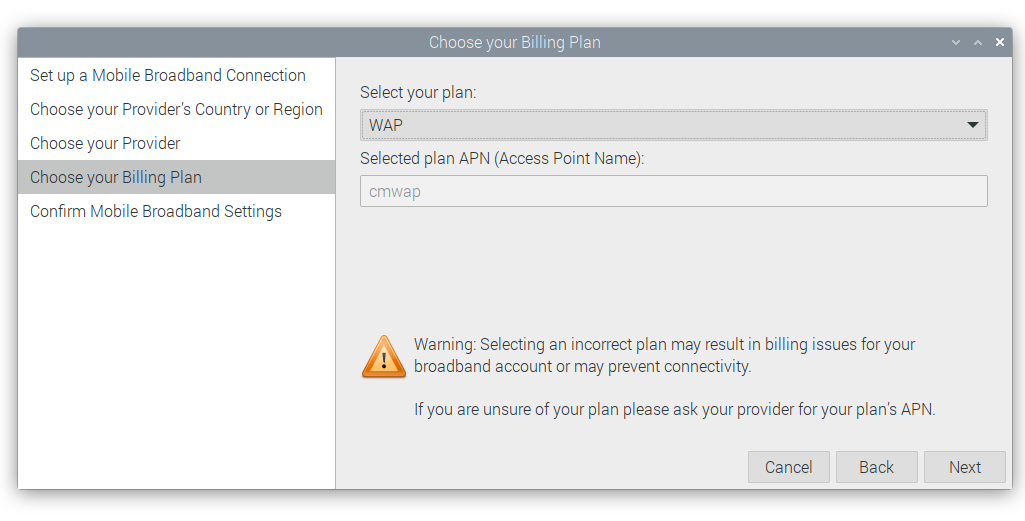
# Lite
使用以下命令来配置一个gsm类型的网络
# sudo nmcli connection add type gsm con-name <connection_name>
# 创建一个名为mobilegsm的gsm网络
sudo nmcli connection add type gsm con-name mobilegsm
提示
如果上面命令没有作用,这里有一些例子,可以仿照例子创建自己的网络
# sudo nmcli connection add type gsm con-name <mobile> ifname cdc-wdm0 gsm.number <number> gsm.apn <apn> gsm.username <username> gsm.password <password>
# 中国移动
sudo nmcli connection add type gsm con-name "mobile" ifname cdc-wdm0 gsm.number "*98*1#" gsm.apn "cmnet"
# 中国联通
sudo nmcli connection add type gsm con-name "Unicom" ifname cdc-wdm0 gsm.number "*99#" gsm.apn "3gnet"
# 中国电信
sudo nmcli connection add type gsm con-name "Telecom" ifname cdc-wdm0 gsm.number "#777" gsm.username "ctnet@mycdma.cn" gsm.password "vnet.mobi"
# 配置连接优先级
默认优先级是 以太网>WiFi>4G 这里举例如何修改优先级
# 列出所有网络连接的详细信息
nmcli connection
# sudo nmcli connection modify <connection name> ipv4.route-metric <value>
# 例如
sudo nmcli connection modify China\ Telecom\ CTNET ipv4.route-metric 200
# ipv4.route-metric的值设置的越小, 这个网络的优先级就越高
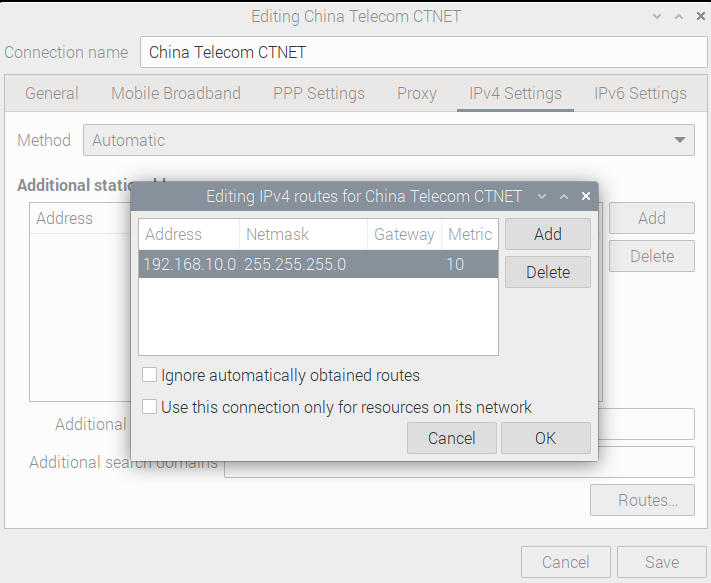
# 配置路由规则
# Desktop
为网络的IPv4配置路由规则,这可以保证特定的ip使用指定网络去访问
右键点击图标
选择需要修改的网络
配置网络,选择IPv4设置
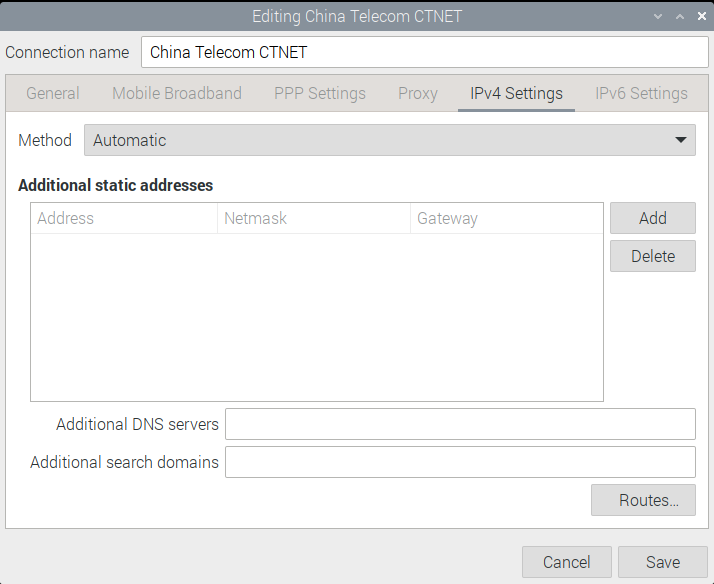
添加路由规则
# Lite
- 显示所有网络连接
nmcli connection
- 设置路由规则
# sudo nmcli connection modify <connection name> ipv4.routes <ip/mask metric>
# 举例
sudo nmcli connection modify China\ Telecom\ CTNET ipv4.routes "192.168.168.0/24 15"